This week it’s Sofia’s turn to lead the challenge and she’s given us a great topic. To tell you the truth, when I was just starting to explore photography, the terms ISO, aperture, and shutter speed made my head spin, but in fact, over the years I’ve realized that they are wonderful tools to help us create images that are visually interesting.
At the beginning, I often had trouble finding the right balance of light and shadow. My photos were often underexposed or overexposed. When I got it right, I attributed it more to luck (or the automatic settings) than to skill. Several years ago, my son told me it was about time I stopped using the auto settings. (Don’t you love it when your kids are right!). Over the years, I’ve gotten more and more comfortable with adjusting the aperture, shutter speed and ISO to get the right amount of light.

One of my first experiments with exposure was HDR (high dynamic range) photography, which expands the range of light and dark tones in your photos. (Once again, I’ve got my son to thank.)
Over the years, this process has become more and more automated, so now I just need to set my Fuji camera on HDR and my camera automatically takes multiple images of the same subject at different exposures. Then, I combine the images in Photoshop to bring out greater details and depth in the image, like the one here of the Vancouver skyline.
More recently, I’ve been experimenting with exposures and different filter effects in Photoshop. The first image below was shot with my trusty Canon 40D in Scottsdale, Arizona. I was shooting at night, but the trees were brightly lit. So, I set my ISO to 1,000, the aperture to f 3.2 and the camera speed to 0.3 seconds.
In Photoshop, I upped the contrast and brightened the trees, but I wanted to bring out the details of the palm fronds and create a more dramatic shot. So in the second photo, I applied the Topaz Silver FX filter to transform the image into black and white. I also increased the brightness and contrast. I think you’ll agree that the black and white is more dramatic and detailed.


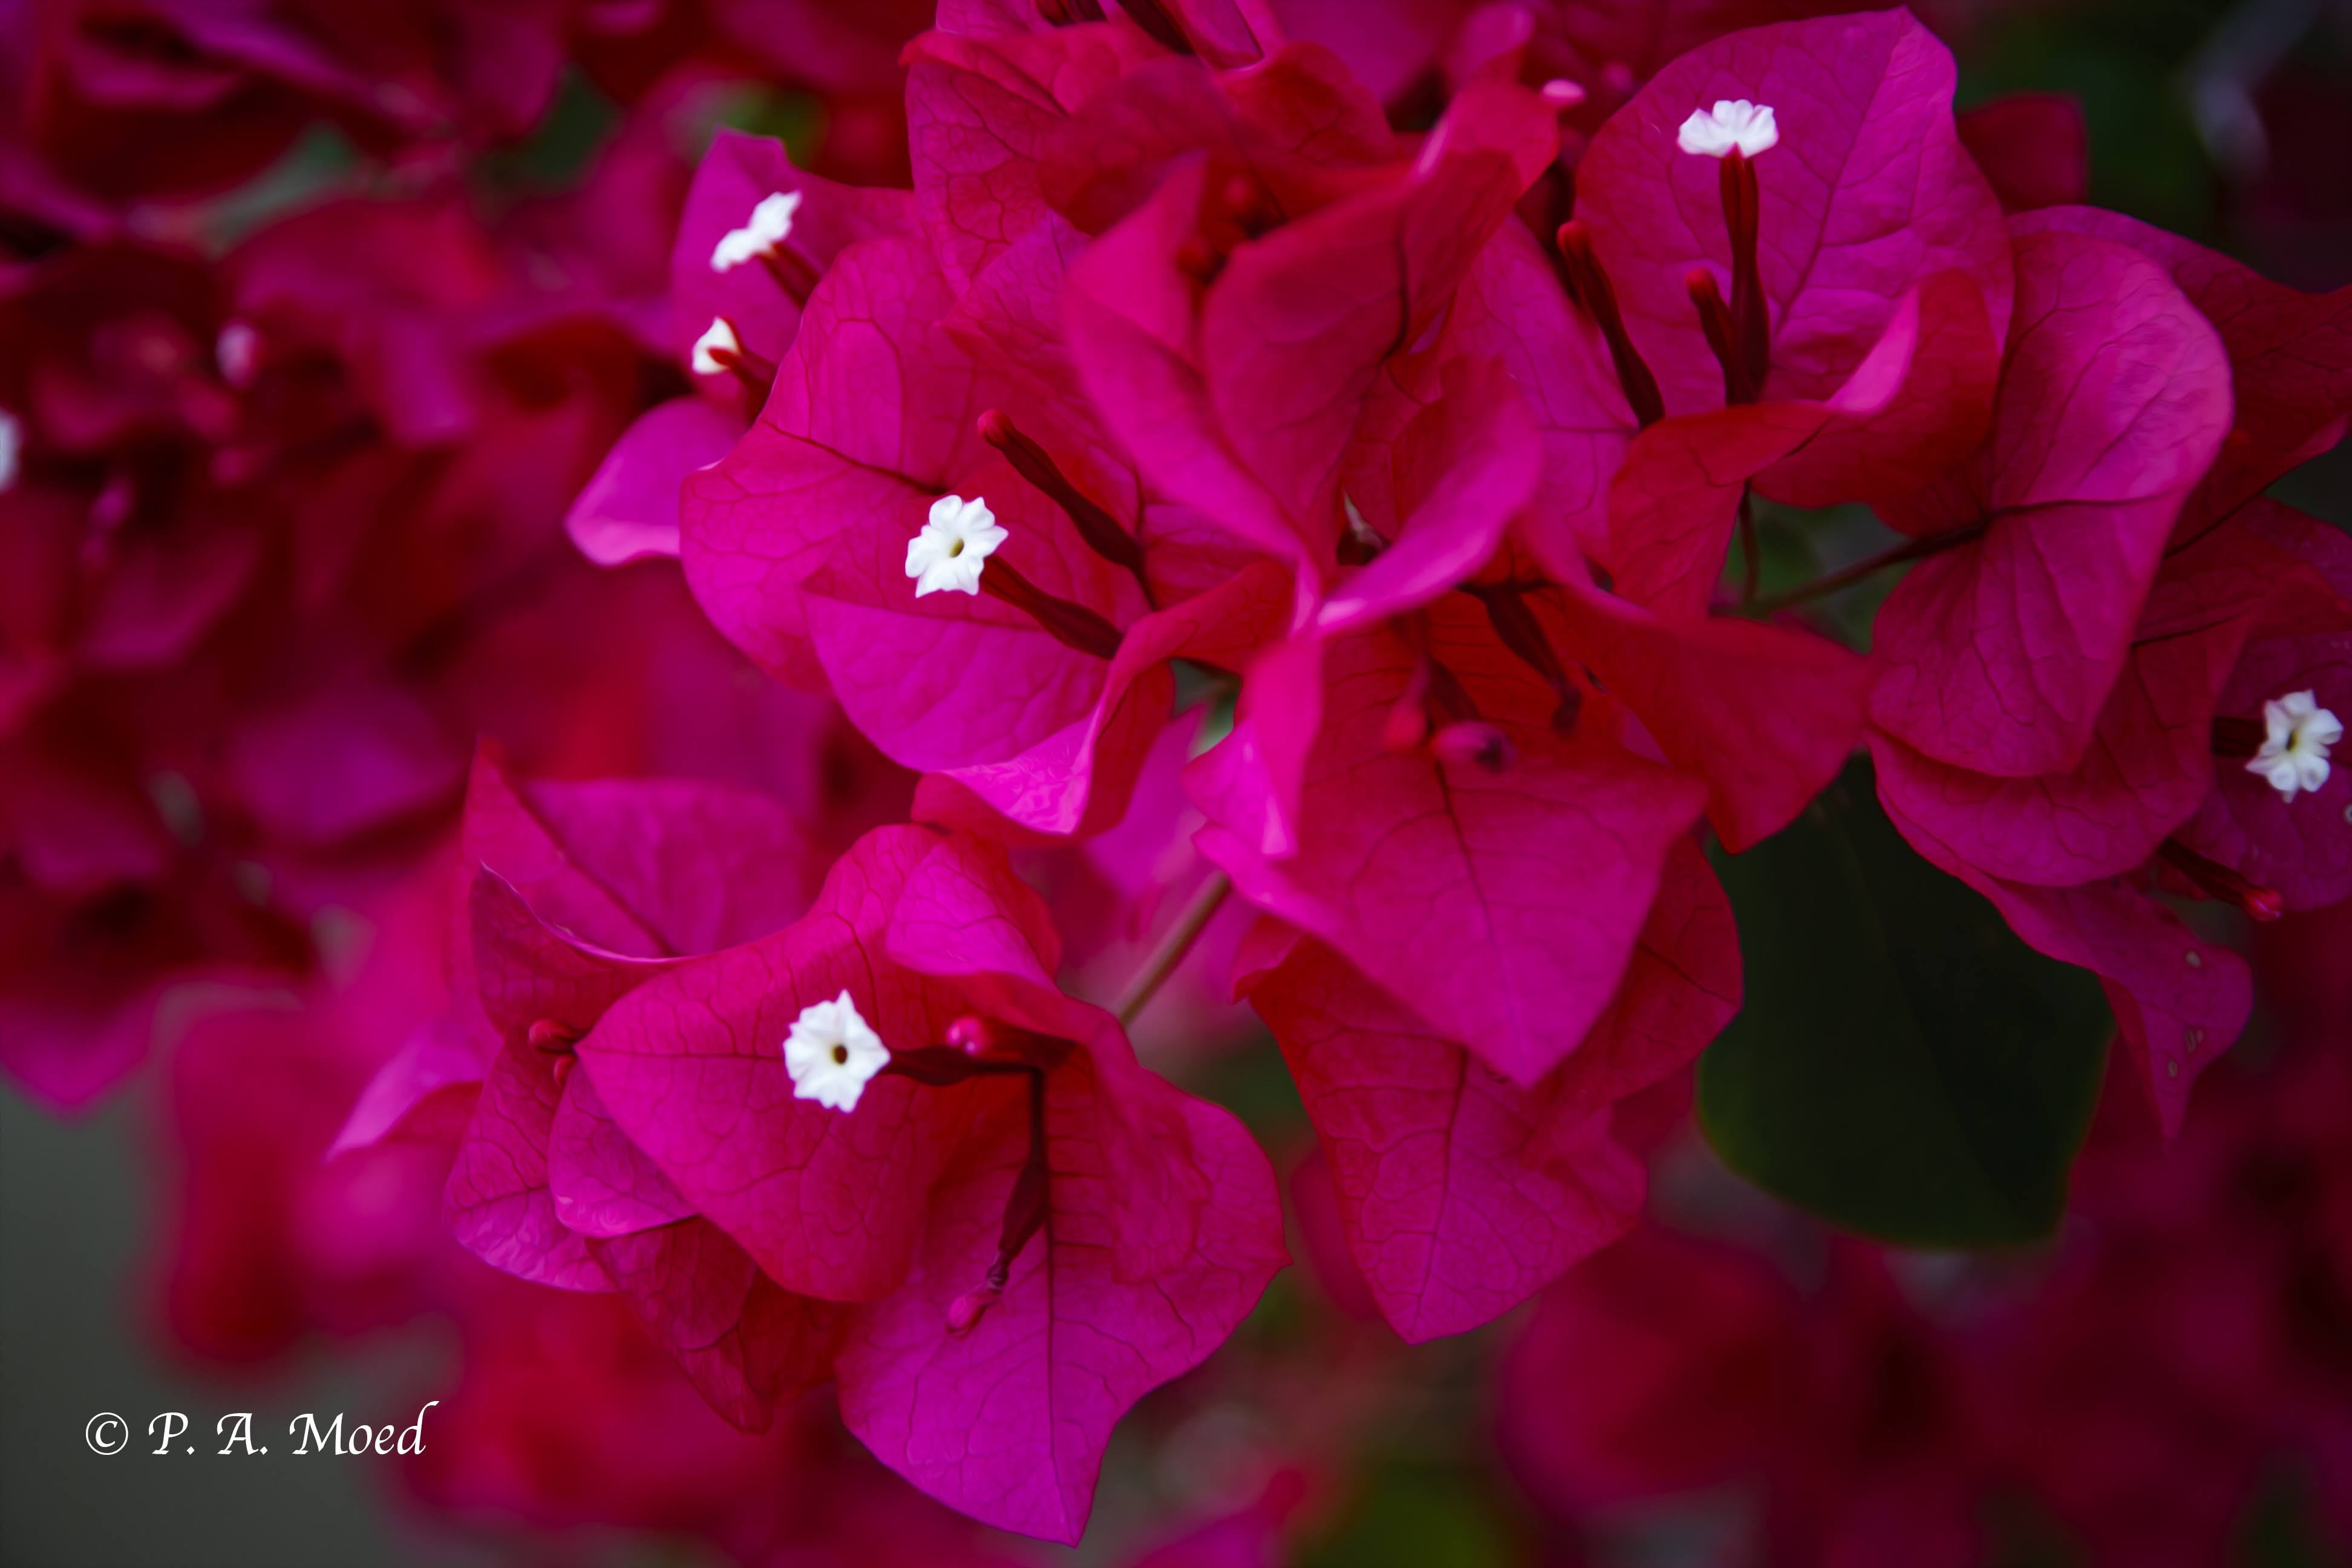
Sometimes I experiment with lightening or darkening just a section of the image. Here is a photo taken outside on a summer afternoon. The ISO was set to 100, the aperture f4.0 and the shutter speed to 1/20th of a second. In Photoshop, I tried brightening just the center of the flowers in order to draw the viewer’s eye to that sweet center spot. On the right, I used a low key filter to darken the background. I prefer the low key image because the darker background really brings out the color and shape of the flowers. Do you agree?

In the next set, I experimented with an image from the Anthropology Museum in Vancouver, which has an outstanding collection of Haida indigenous art. I took a photo of one of the Haida masks with my 35 mm lens, which has a very wide aperture (f1.4) and used an ISO of 2,000 because the museum wasn’t brightly lit. The shutter speed was 1/60th of a second.
In Photoshop, I darkened the image on the left so that the background was entirely black, hoping to eliminate a distracting background. With the image on the right, I applied an antique filter which bleached the image and changed it to black and white. This shift creates two very images with very different “moods”–one of the powerful effects of different exposures. I like them both. Do you prefer one over the other?


As I experimented more with my camera and went off automatic settings, I began to see the power of the big three–the ISO, the aperture, and the shutter speed. I’m sure the same will be true for you. Over time, it has become second nature to adjust the settings according to the lighting conditions and the subject. But like Sofia, I sometimes forget and just start shooting. This is my next goal!
A special thanks to Sofia for hosting a great challenge this week. We hope you join us. If you do, be sure to include a link to Sofia’s post and include the Lens-Artists tag so we can easily find your post in the Reader. Next week, it’s Anne Sandler’s turn to lead us so be sure to visit Slow Shutter Speed next Saturday at noon to get all the details.
Until then, I hope you have a week with plenty of sunshine, good health and inspiration!
Categories: Photography

I confess I often rely on the automatic settings on my camera, but when lighting conditions are challenging or I want to create a particular effect, I set aperture and/or shutter speed myself. You make a strong argument for doing so more often 😀
You asked for feedback, so here are some thoughts. I love the B&W version of the palm trees, the darker exposure for the bougainvillea and the black background for the mask.
LikeLiked by 1 person
Hi, Sarah. Thanks so much for your thoughts, as always. They’re very helpful. I get lazy sometimes and use the automatic settings, but sometimes it’s essential when I need to double check that my settings are good!
LikeLiked by 1 person
I, too, spend too much time on automatic. It’s a hard habit for me to break.
Apparently, I’ve gone to the dark side… I prefer the darker of the last two sets of images, and of course, the black-and-white over the color palm tree.
LikeLiked by 1 person
Interesting. I guess I’ve gone to the dark side, too! 😀. But there is something about the bleached out mask that intrigues me. It is a hard habit to break (getting off auto). My son called me out on it…otherwise, I’d still be doing it all the time. 😀😀.
LikeLiked by 1 person
Excellent exploration of the power that comes with knowing our technology Patti. I remember a time when HDR was all the rage but was totally obvious. These days one can use it to much more subtle effect as well as to create images that are more like op-art. The opportunities are limitless if we understand both our camera’s power and that of the myriad of post-processing tools. Your images of the mask really drew me in. After some study I found I liked the B&W image on the right a bit more but what a great subject beautifully presented. Also loved the Vancouver image.
LikeLiked by 2 people
Hi, Tina. I agree that the subtle HDR effect is much better. It’s also true that the more I learn, the more I can use the camera to express what I want. The b & w does create a striking image in the right conditions, I think. Fascinating topic this week. There’s always more to learn, isn’t there!
LikeLike
I still struggle to come off Automatic. You show that it’s really worth the effort. Must Try Harder (Me, that is)
LikeLiked by 2 people
I confess that sometimes I set it on auto just to get a sense of the ISO and then I put it on that setting in manual. 😀😀😀
LikeLiked by 1 person
Oh really? Now that’s interesting!
LikeLiked by 1 person
Is that cheating?? 😀😀😀
LikeLiked by 1 person
No! Inspired!
LikeLiked by 1 person
😀😀😀
LikeLiked by 1 person
I like the image of the palm trees, very creative and cool looking especially with the second image in that set.
LikeLiked by 1 person
Thank you so much, Yinglan. I’m glad you like that one.
LikeLiked by 1 person
I prefer the last two darker examples, I think they work better for the subjects, Patti. Your plam trees are brilliantly captured and I like them both. It’s funny how HDR always looks better when it’s not me doing it. I ended up with a mock HDR setting on Lightroom that is not as harsh, but your photo is perfect. When it comes to auto or manual, I think we end up changing when we notice that automatic just doesn’t cut it anymore, we need more control. Getting it right is the tricky part 🙂
LikeLiked by 1 person
I know exactly what you mean about HDR. I end up turning the settings way down because they seem too harsh and obvious!! Thanks for a great challenge, Sofia. I’m back from our short trip, so now I’m catching up with the posts.
LikeLiked by 1 person
Great examples Patti 😀
LikeLiked by 1 person
Thanks so much, Cee!
LikeLiked by 1 person
I too tend to stick with auto settings, I don’t have much success when trying to set the options myself. Though I do use manual focus with the macro lens. I like the low key bougainvillea and the colour version of the mask.
LikeLiked by 1 person
Manual for macro…yes. I do the same thing. I’m delighted you liked the bougainvillea and the mask! Glad you stopped by, Jude.
LikeLike
Excellent examples Patti. I like both the tree shots, as different as they are.
LikeLiked by 1 person
Thank you, John! They are very different, but I agree!
LikeLike
Sliders are great for examples Patti 🙂
LikeLiked by 1 person
Glad you think so, Brian. It’s easier to see the difference. 😀😀
LikeLiked by 1 person
Excellent examples. In all of these I like the second versions best
LikeLiked by 1 person
Thanks so much, Nora. I agree!
LikeLiked by 1 person
I use Aperture mode and adjsut some settings while taking the photos, but post editing is my thing, great examples
LikeLiked by 1 person
I confess it’s my go-to process most of the time. It’s amazing what Photoshop can do now. Sky replacement! Perspective warp. Amazing. I appreciate your thoughts,
Ritva!
LikeLike
Love the palm fronds in B & W and also the Anthropology Museum art ( prefer B & W though)
Thank you Pattimoed.
LikeLiked by 1 person
I’m drawn to the b & w as well, Philo. I think under the right conditions, b & w creates striking images. I appreciate your thoughts, as always, Philo.
LikeLiked by 1 person
You are welcome Pattimoed.
LikeLiked by 1 person
Well presented examples as usual, Patti! Love The dark side – mostly! The palm trees in B&W and the mask in both examples. But there is something special with that mask…I guess it will look intriguing in any setting.
LikeLiked by 1 person
Another fan of the dark side!! I know what you mean about the mask. I’m fascinated by it and will definitely go back there to take more photos of some of the different masks. Have a great week, AC. Now I’m wondering what you came up with for your post. 👍
LikeLike
Looking forward to seeing more masks, Patti!
LikeLiked by 1 person
Definitely! Very intriguing, aren’t they?
LikeLike
😀
LikeLike
Amazing post Patti! Thanks for taking us on your journey from auto to manual. You do a great deal in post to create wonderful images.
LikeLiked by 1 person
Thanks so much, Anne! I am delighted to hear you like this one. It was interesting to think through how things have changed when I switched from auto to manual. It’s been a journey….but that’s the fun, isn’t it? Have a good week, too.
LikeLiked by 1 person
These are such great examples of exposure, Patti, and I especially like the HDR effect of the Vancouver skyline, the colors are so lovely! I usually shoot in AP and use Photoshop, Nik and/or Topaz in post editing to get the exposure I want. I should probably start relying more on the camera setting to see how that works but I often forget about that when in the field shooting!
LikeLiked by 1 person
I’m sorry I didn’t see this comment, Sylvia. Thanks for stopping by. I think we all rely more on auto settings! I’ve resolved to experiment more…and try different settings. I know what you mean about getting caught up in the moment and forgetting to adjust the settings.
LikeLike
Lovely set. I like the compares of the Bougainvillea. The higher exposure brings out the beautiful veins in the magenta coloured bracts, but the lower exposure is perfect for the white flowers.
LikeLiked by 1 person
Thanks, IJ. Yes, I can see what you mean. Both highlight different parts of the flower. Great observation!
LikeLiked by 1 person